Buff
This guide walks you through creating your first buff effect using Master Combat Core.
Prerequisites
Before starting, make sure:
- You already have a
player character. - An EntityComponent has been added to the player prefab (from the previous guide)
- Core Attributes have been set up (e.g. hp, attack)
Step 1 — Create the Buff Graph
- Right-click in the Project Window and create a new GraphObject:
Create > Soft Kitty > Node Graph Object
- Double-click the asset to open it in the Graph Editor
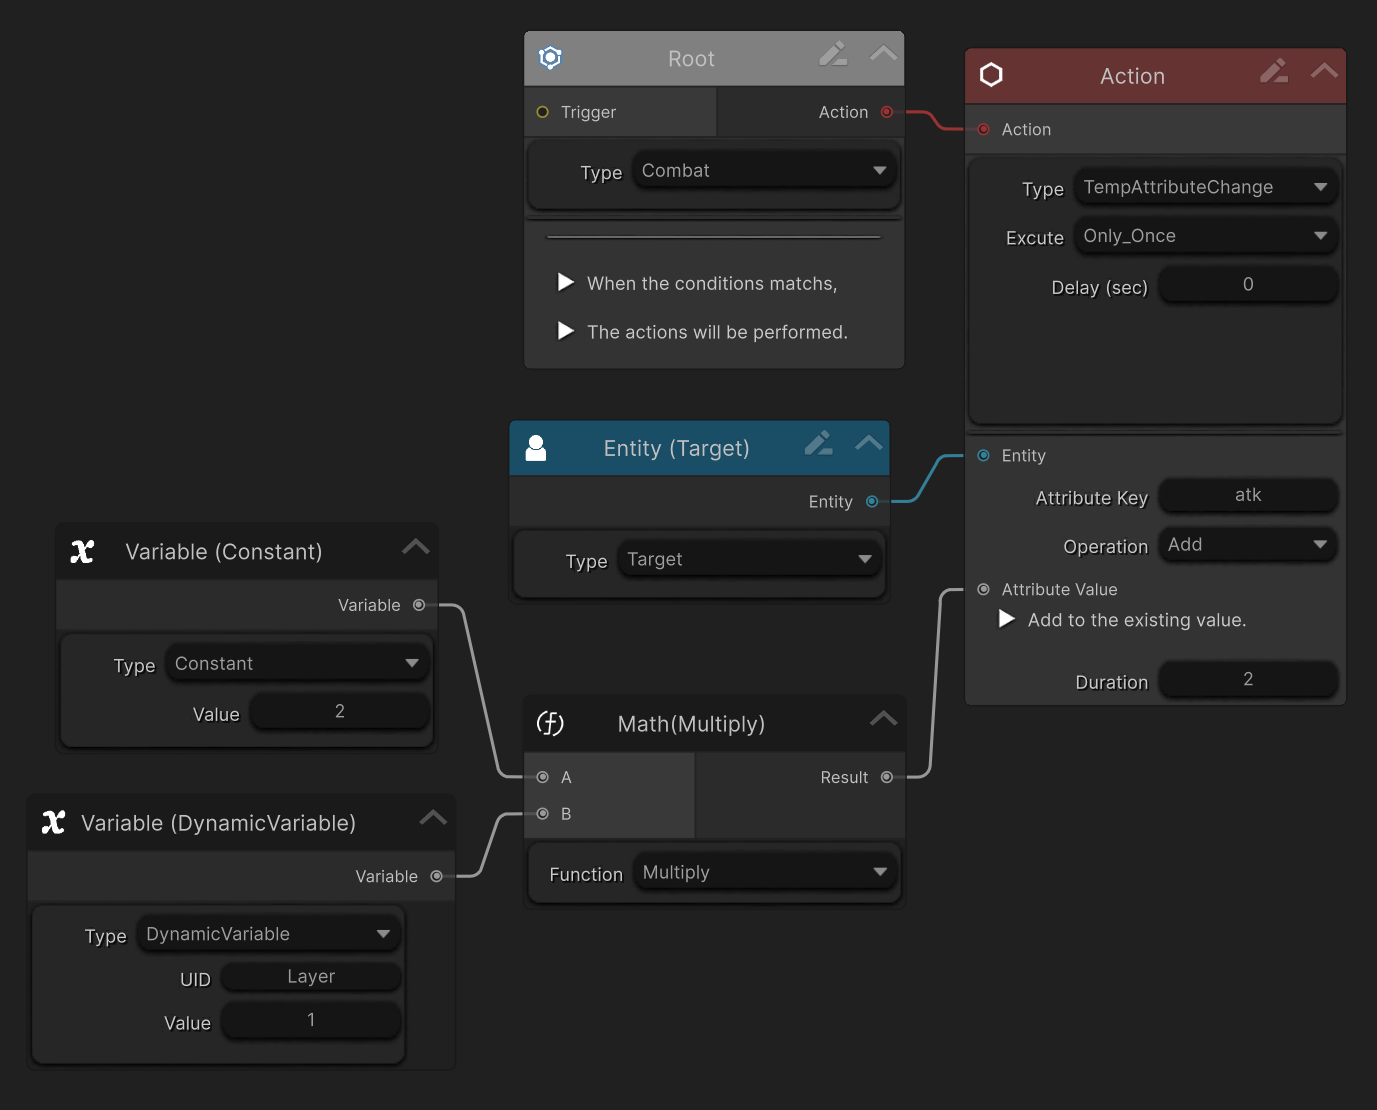
- Create two Variable Nodes and set their type to .
- Configure them as follows:
UID Type Default Value N/A Constant 2 Layer Dynamic Variables 1 - Add a Math Node → Multiply.
- Connect both Variable Nodes to the input ports of the
MultiplyMath Node.
Step 2 — Configure Always-On Execution
-
Remove the Trigger Node and Condition Node.
Buff graphs are executed continuously by the Over-Time Effect system and do not require triggers.
-
Create a
TargetEntity Node and connect it to theEntityinput of anTempAttributeChangeAction Node. Make sure the type of the Action Node is TempAttributeChange notAttributeChange. -
Connect the
MultiplyMath Node output to the Value input of theAttributeChangeAction Node. -
Configure the Action Node:
- Attribute UID: atk
- Operation: Add
- Duration: 2
Your graph should now look like this:
Step 3 — Create the Over Time Effect (OTE)
- Go to:
Project Settings > SoftKitty > SubData - Over Time Effect
- Click
Add New OverTimeEffect. - Fill in basic information such as:
Display NameCategoryDuration
- Set:
- UID: rage
- Design Graph: drag in the Buff Graph you just created
- Enable:
Can Be RefreshedLayered- Set
Maximum Layerto 99
Step 4 — Apply the Buff via Code
You can now apply the Buff to an entity using code:
GameManager.GetPlayer().AddOverTimeEffect("rage", null);
During runtime:
- Monitor the EntityComponent Inspector.
- Repeatedly apply the Buff
- Observe that:
- The effect stacks
- Buff scales with the number of layers
- The player’s attack increases accordingly
Step 5 — Apply Buff from a Damage Graph (On Hit)
You can also apply a Buff from another Graph.
- Open the
Damage Graphcreated in the previous guide. - Add a new Action Node.
- Change its type to
OverTimeEffect. - Set:
Effect IDto the integer ID ofrage- Connect the
DealerEntity Node to this Action Node
Now, when the damage graph executes:
rageis added to the attacker on hit
Result
You now have:
- A fully functional Damage-over-Time system
- Layered and refreshable effects
- Graph-driven buff logic
- Reusable buff behavior across skills, weapons, and enemies
Notes & Best Practices
-
TempAttribute for time-based modifiers applied to attributes
-
The same Buff graph can be reused across multiple effects