Customize Health Bar
Customize Health Bar
You can create your own custom bar texture atlases for all supported bar styles.
Once a texture is placed in the correct Resources folder and follows the expected naming and layout rules, it can be selected directly from BarSettings.
Folder Location
Place custom bar textures in:
Assets/SoftKitty/MasterHealthBarSystem/Resources/HealthBarSystem/BarStyles/
Naming Rules
The texture filename depends on the selected bar type:
Classical#.pngSegment#.pngBall#.png
# is the numeric ID of the texture.
Use the next available number after the highest existing file in the folder.
Examples:
Classical5.pngSegment3.pngBall7.png
For Classical and Segment bars, you also need a matching settings text file in the same folder:
TextureName_Setting.txt
Example:
Classical5_Setting.txt

General Texture Rules
A health bar texture is a texture atlas containing multiple visual layers such as:
- frame
- background plate
- main fill bar
- overlay bar
- glow effects
- value-change effect
For all bar types, the graphics for each layer must be aligned consistently inside their cells. This is important because the shader stacks these layers together at runtime. If one layer is offset differently from the others, the final rendered bar will not line up correctly.
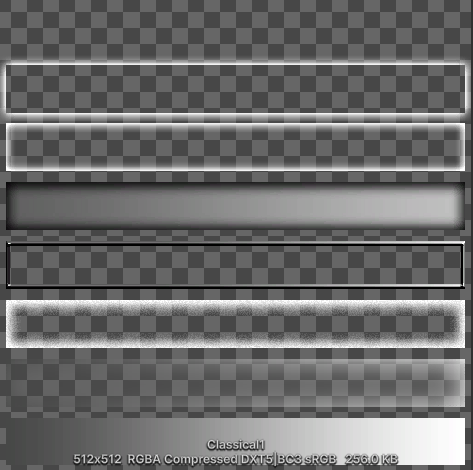
Classical Bar
Texture Specification
- Height:
512 px - Width: any value
- Vertical layout:
8evenly split sections - Section height:
64 px - In the
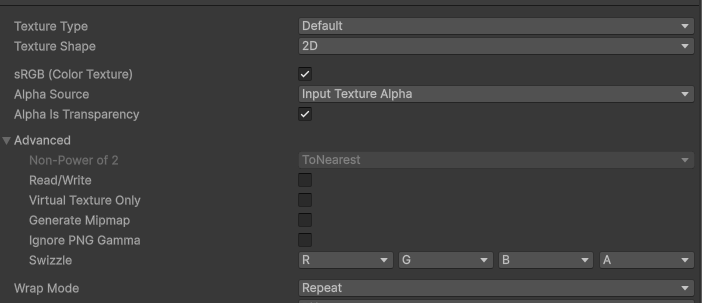
Texture Import Settings, checkAlpha Is Transparency, uncheckGenerate Mipmap, selectWrap ModetoClamp

The texture is split from bottom to top into these layers:
BarValue Change EffectOverlay BarFrameBack PlateInner Glow EffectOutline EffectUnused
The width is flexible, but the bar size you use in BarSettings and OverheadSettings should match the texture's aspect ratio for the best visual result.
Settings File
A classical bar requires a matching settings file containing 5 comma-separated values.
Example:
5,2,0.25,0.01,16
These values mean:
Left padding of the bar value text- Range:
0toText cell count - Defines where the bar value text starts.
- Range:
Right padding of the bar value text- Range:
0toText cell count - Defines where the bar value text ends.
- Range:
Normalized left padding of the bar- Range:
0to1 - Defines where the visible fill area starts inside the texture.
- Range:
Normalized right padding of the bar- Range:
0to1 - Defines where the visible fill area ends inside the texture.
- Range:
Text cell count- Total number of horizontal cells reserved for bar value text.
- This also determines the maximum number of characters that can be displayed on the bar.
Example Calculation
If the visible bar graphic starts 32 px from the left edge of a 512 px texture:
32 / 512 = 0.0625
So the normalized left padding should be 0.0625.
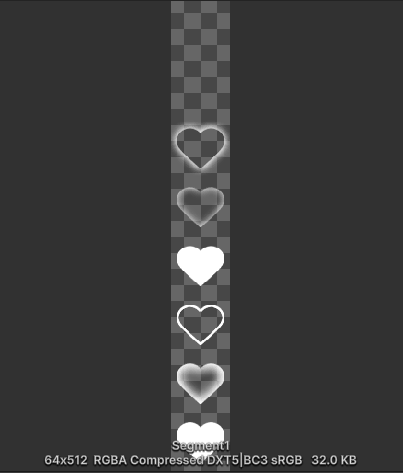
Segment Bar
Texture Specification
- Width:
64 px - Height:
512 px - Vertical layout:
8evenly split sections - Section height:
64 px - In the
Texture Import Settings, checkAlpha Is Transparency, uncheckGenerate Mipmap, selectWrap ModetoRepeat
The texture is split from bottom to top into these layers:
BarOverlay BarFrameBack PlateInner Glow EffectOutline EffectUnusedUnused
As with other bar types, all layers must be aligned to the same graphic position inside their cells.
Settings File
Segment bars do not need a _Setting.txt file.
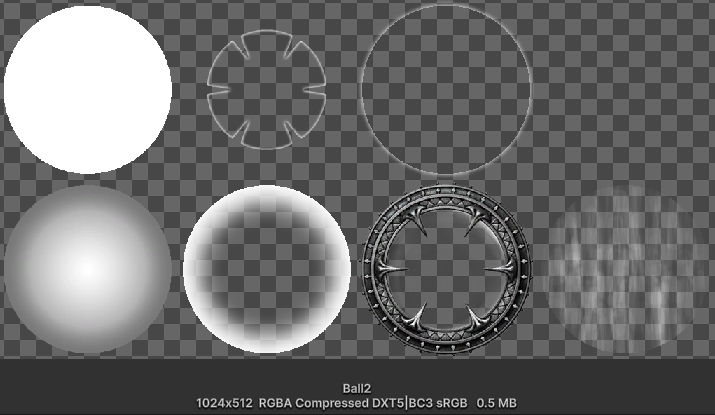
Ball Bar
Texture Specification
- Width:
1024 px - Height:
512 px - Grid:
4 columns x 2 rows - Cell size:
256 x 256 px - In the
Texture Import Settings, checkAlpha Is Transparency, uncheckGenerate Mipmap, selectWrap ModetoClamp
The cells are read from left to right, top to bottom:
Back PlateInner Glow EffectOutline EffectUnusedBarOverlay BarFrameValue Change Effect
Settings File
Ball bars do not need a _Setting.txt file.
Recommended Workflow
- Choose the bar type you want to customize.
- Duplicate an existing built-in texture as a template.
- Redesign the atlas while preserving the required layout.
- Save it using the correct name in the
BarStylesfolder. - If the style is
ClassicalorSegment, create the matching_Setting.txtfile. - Open BarSettings and select the new style ID from the matching bar type.
- Test the bar in preview and in gameplay to confirm alignment, text placement, and effect behavior.
Design Tips
- Keep all layers perfectly aligned across the atlas.
- Test the bar at the actual runtime size, not only at full texture resolution.
- If your design has thick side borders, make sure the padding values in the settings file are correct.
- For classical bars, verify both the fill area and the text area independently.
- For segment bars, check that spacing and segment width still feel clean when repeated many times.
- For ball bars, make sure the circular fill and overlay graphics remain centered across all cells.
Related Pages
- Use BarSettings to choose the custom bar style.
- Use [Customize Font] if you also want to replace the value text texture.