Sub-Maps
Sub-Maps: Detailed Location Views
For Static Map Mode Only
Beyond providing a main map texture for each scene height/layer, the Static Map Mode System offers Sub-Maps to display highly detailed textures for specific locations within your scene. This allows for an enhanced user experience by revealing granular detail in key areas.
How Sub-Maps Work:
Sub-Maps are designed to automatically provide a more detailed view of specific points of interest in your game world.
Automatic Switching:
- When the player enters a defined
Sub-Map Zone(a rectangular bounding box you configure), the Map Interface will automatically switch from the main scene map to display the detailed sub-map texture of that zone. - Upon exiting the
Sub-Map Zone, the Map Interface seamlessly switches back to the main scene map texture.
Flexible Layering:
A key advantage of Sub-Maps is their independent layering. While your main map might have a single layer (height), a Sub-Map for an indoor location like a multi-story castle can have multiple distinct layers (e.g., Basement, Ground Floor, First Floor, Rooftop), each with its own detailed texture.
Map Point Linking (for Preview):
You can link a standard Map Point to a specific Sub-Map location.
When the player clicks on such a linked Map Point on the main map interface, the system will temporarily switch to display the detailed sub-map texture of that zone, offering a preview without the player needing to physically enter the zone.
Setup Guide: Configuring Sub-Maps:
Follow these steps to define and configure Sub-Map zones for your scenes:
- Navigate to the Scene | Map section within the Map package settings in your Unity Editor.
- Locate and expand the Detailed Location Sub-Maps settings.
- Click the
Add New Sub-Mapbutton. A newsub-mapentry will appear for the currently selected scene. - Configure the following properties for your new
Sub-Map:-
(Sub-Map) UID: Enter a unique identifier for this Sub-Map within the current scene. This ID is used for internal referencing and linking.
-
(Sub-Map) Display Title: Provide a descriptive title. This title will be displayed on the Map Interface when the player is inside this Sub-Map Zone.
-
(Sub-Map) Add New Map Layer: Click this button to add map layers specific to this Sub-Map. Set up each layer's properties (e.g., texture resolution, scale, and offset) in the same manner as you would for main map layers.
-
(Sub-Map) Bottom Left Corner Position: The bottom left (-x,-z) point of the
Sub-Mapzone. -
(Sub-Map) Top Right Corner Position: The top right (+x,+z) point of the
Sub-Mapzone.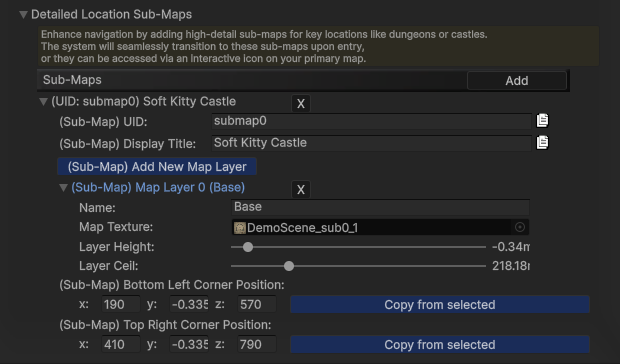
-
Baking Sub-Map Textures:
Once your Sub-Map zones and layers are configured, you'll need to bake their detailed textures:
-
Open the Map Generator tool.
-
Locate the
Bake for Sub-Mapcheckbox and enable it. -
Use the left and right arrow buttons adjacent to this checkbox to browse through the existing
Sub-Maplocations you've defined.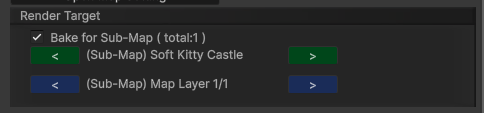
-
Select the specific
Sub-Mapyou wish to bake the texture for. -
Proceed to bake the texture for the selected
Sub-Map's layers, following the same process as introduced for baking main map textures. -
After baking, the generated texture will be automatically assigned to the corresponding layers of the selected
Sub-MapZone.
Linking Map Points to Sub-Maps for Preview
To enable interactive previewing of Sub-Maps directly from the main map:
-
Select the MapPoint component on the GameObject you wish to link.
-
Locate and check the
Click to open sub-mapcheckbox within the MapPoint settings. -
Use the left and right arrow buttons (or dropdown selector, if available) to choose the target
Sub-MapZone that this MapPoint should preview when clicked.