Static Map Mode
This section is for scene-based games with pre-designed levels using pre-generated map textures. For procedurally generated worlds or seamless, massive open-world environments using real-time render texture, please jump to the Dynamic Map Mode section.
Before diving in, here are a few key things you need to know:
Demo Scene Path: Assets/SoftKitty/MapNavigationSystem/Demo/Scenes/DemoScene.unityPackage Settings: Edit > Project Settings > SoftKitty > Map NavigationUI Prefabs: Assets/SoftKitty/MapNavigationSystem/Prefabs/Interface/Map Creator Prefab: Assets/SoftKitty/MapNavigationSystem/Prefabs/MapGenerator.prefab
1. Adding Your Scene to the Map System
-
Open one of your game scenes.
-
Go to MNS (Master Navigation System) settings panel:
Project Settings > SoftKitty > Map Navigation. -
Expand the Scene | Map section.
-
Select
Static Mapmode.
-
Click
Add Current Sceneto add the current scene to the map system. Alternatively, you can clickRefresh Scene List From Build Settingsto add all scenes from yourBuild Settingsat once.
2. Configuring the Map Layers
- Expand the settings for the added scene.
- (Optional) Click
Add New Map Layer. This is only needed for multi-level scenes, such as buildings with multiple floors. For flat scenes, only one layer is needed. - Expand the Base Layer settings:
- Name: A label for your layer (for reference only).
- Map Texture: The map background texture (created in Step 3).
- Layer Height: For multi-level or interior scenes, this defines the ceiling height of the layer. Ensure it matches your roof height for accurate rendering.
3. Generating the Map Texture
Click Open [Map Generator] Tool at the top of the settings panel to add the Map Generator prefab to your scene.
4. Adjusting the Map Area with the Map Generator
-
In the
Scene View, you’ll see a giant yellow box representing the map area. -
Expand the Map Generator GameObject in the hierarchy, and you’ll find two child GameObjects: TopRight , BottomLeft. Move these two points to adjust the width and length of the map area.
-
In the inspector of the Map Generator GameObject: Adjust the
Height Rangevalue to ensure the box correctly covers the area intended for the map. Keep in mind: The map must be square. If your scene is narrow, align the box to the longest side, leaving blank areas as needed.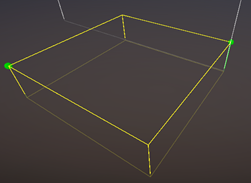
5. Configuring Map Generator Settings
- In the inspector of the Map Generator GameObject, you’ll find all the render settings. Most settings can remain as default, but make sure set the
Layer Maskto include all objects you want to render on the map. - Under
Map Generator, you’ll see a GameObject called Ocean: If you want blank areas to appear as water, adjust theOceanGameObject’s height to the water level; If not, simply disable theOceanGameObject. - To reduce render time while testing settings: Set
Output Sizeto 1024, clickBakeand wait approximately a minute for rendering to finish. - Once satisfied with the result: Set the final
Output Sizeto 4096 (recommended),Bakeagain — this may take longer, so grab a cup of coffee while it finishes.
6. Assigning the Map Texture
-
After baking, your map texture will appear in:
Assets/SoftKitty/MapNavigationSystem/MapTextures/ -
The texture will automatically be assigned to the current layer settings.

-
Go to the "Project Settings > SoftKitty > Data Settings" section and confirm that the
Ground Layer Maskincludes the correct layers used for ground and buildings in your project.
7. Adding the Map UI Prefabs
Drag the following UI prefabs from:
Assets/SoftKitty/MapNavigationSystem/Prefabs/Interface/
Place them on your UI Canvas:

The WorldMap prefab should remain disabled unless you want it to be active by default when the game starts.
8. Adding Map Points
-
Attach the MapPoint component to NPCs, Monsters, or Locations in your scene: For Locations, it’s best to attach the MapPoint component to an empty GameObject. This allows you to adjust its position without affecting the actual model.
-
Configure the MapPoint options as needed, pay attention to the
Visible Distancesetting: This controls how close the player must be for the icon to appear on the Navigation Bar interface. It does not affect the map display itself.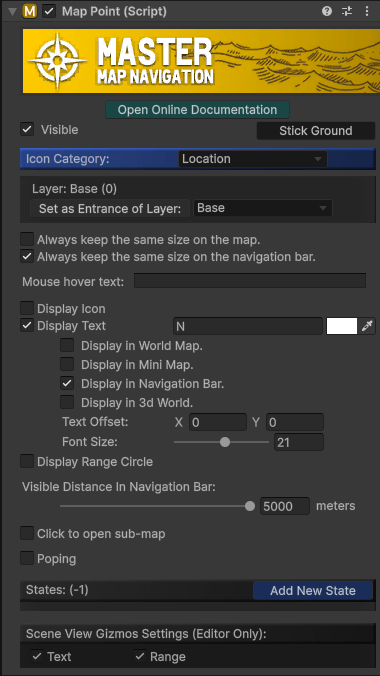
9. Baking Navigation Path (Optional)
If you’re using the Navigation Path module, bake the Unity NavMesh for your scene:
-
For older Unity versions: Access the baking panel from
Window > AI > Navigation, then use the Bake panel.
Then use
Bakepanel to do the baking.
-
For newer Unity versions: Use the
NavMesh SurfaceandNavMesh Modifiercomponents. Refer to Unity’s documentation for details: https://docs.unity3d.com/Packages/com.unity.ai.navigation@2.0/manual/CreateNavMesh.html
10. Setting the Player and Camera
- The system needs to identify the player transform: Add the following code in your player control script:
private void Awake()
{
     MapManeger.SetPlayer(Player);
}
- Ensure your main camera has the tag MainCamera, or set it via code:
private void Awake()
{
     MapManeger.SetCamera(MyCamera);
}
- Reference the
WorldMapGameObject in your script, and bind a key or UI button to open it:
public GameObject WorldMap;
void Update()
{
    if (Input.GetKeyDown(KeyCode.Tab))WorldMap.SetActive(!WorldMap.activeSelf);
}
Final Steps
Run your game and test the full functionality:
- Ensure the map loads correctly.
- Confirm Map Point, Navigation Path, and UI interactions work as expected.