Dynamic Map Mode
This mode is for procedurally generated worlds or seamless, massive open-world environments using real-time render texture. For scene-based games with pre-designed levels using pre-generated map textures, please jump to the Static Map Mode section.
Before diving in, here are a few key things you need to know:
Demo Scene Path: Assets/SoftKitty/MapNavigationSystem/Demo/Scenes/DemoScene.unityPackage Settings: Edit > Project Settings > SoftKitty > Map NavigationUI Prefabs: Assets/SoftKitty/MapNavigationSystem/Prefabs/Interface/Map Creator Prefab: Assets/SoftKitty/MapNavigationSystem/Prefabs/MapGenerator.prefab
1. Switch to Dynamic Map mode
-
Go to MNS (Master Navigation System) settings panel:
Edit > Project Settings > SoftKitty > Map Navigation. -
Expand the Scene | Map section.
-
Select
Dynamic Mapmode.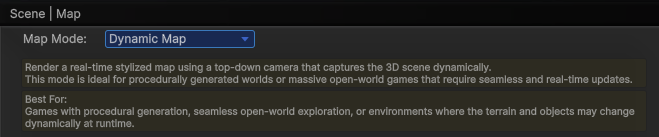
2. Select RT LayerMask(Render Texture LayerMask)
Choose the layers to be rendered into the map's render texture. Ensure that layers containing characters or dynamically moving objects are excluded.
3. Set Render Area Size
This determines how large the area around the player will be captured by the top-down render texture camera.
-
Larger sizes allow the player to scroll further on the
world mapwhenUnlimited WorldMapis unchecked. -
A larger size also reduces the frequency of minimap updates but may have a higher performance cost.

4. Set RT Size (Render Texture Size)
The render texture size depends on the Render Area Size. For optimal clarity, use a larger texture size with a larger render area size (ideally 3 pixels per meter or higher).
![]()
However, larger textures may cause noticeable performance spikes when the minimap updates. (The minimap only updates when the player moves out of the previously rendered area.)
5. Unlimited WorldMap
If your game is massive open world, and you want the player be able to scroll to anywhere instead of limited with the areas around, you can enable this feature.
When enabled, players can scroll the map to any position in the 3D world. Ensure that in your script, your 3D scene within MapInteractive.WorldMapInstance.ViewRect is always loaded to match the visible map area.
6. Setup the RT Camera Height and RT Camera Depth
The render texture camera height must be above the tallest objects in your scene to avoid clipping.
Its depth should cover the lowest point in your scene from the camera's height.
For example
If the highest object in your game is at 200 on the Y-axis, and the lowest point is at -50, set the RT Camera Height to 201 and the RT Camera Depth to 251.
Avoid using unnecessarily large values, as they may cause issues with the stylized rendering and reduce performance efficiency.
7. Choose Stylized Rendering
To enable stylized rendering for the render texture:
- Check the "Stylized Rendering" checkbox.
- In the "RT Material" field, select a material from:
Assets/SoftKitty/MapNavigationSystem/Materials/CustomRenderTexture/. When using these materials, ensure theDepth Onlyoption (located below theRT Materialsetting) is also checked.
If you'd like to create your own custom render texture shader:
- Use Shader Graph to create a custom shader.
- Create a new material and assign your custom shader to it.
- Assign the
Assets/SoftKitty/MapNavigationSystem/Textures/System/DynamicMapSourceRTto theInputTexslot of the material. - Finally, assign your new material to the
RT Materialfield.
This allows for full customization of the map's visual style.
8. Adding the Map UI Prefabs
Drag the following UI prefabs from:
Assets/SoftKitty/MapNavigationSystem/Prefabs/Interface/
Place them on your UI Canvas:

The WorldMap prefab should remain disabled unless you want it to be active by default when the game starts.
9. Adding Map Points
-
Attach the MapPoint component to NPCs, Monsters, or Locations in your scene: For Locations, it’s best to attach the MapPoint component to an empty GameObject. This allows you to adjust its position without affecting the actual model.
-
Configure the MapPoint options as needed, pay attention to the
Visible Distancesetting: This controls how close the player must be for the icon to appear on theNavigation Barinterface. It does not affect the map display itself.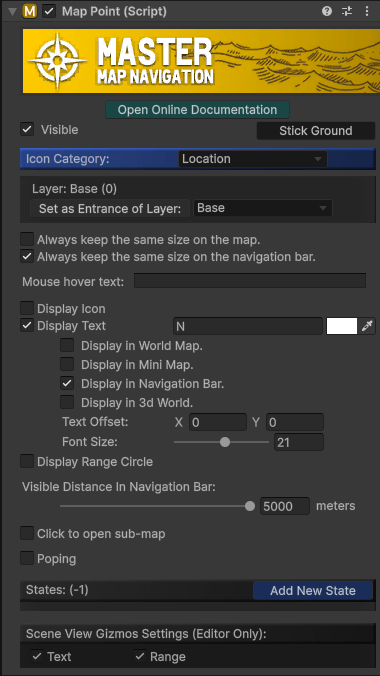
10. Baking Navigation Path (Optional)
If you’re using the Navigation Path module, bake the Unity NavMesh for your scene:
-
For older Unity versions: Access the baking panel from
Window > AI > Navigation, then use the Bake panel.
Then use
Bakepanel to do the baking.
-
For newer Unity versions: Use the
NavMesh SurfaceandNavMesh Modifiercomponents. Refer to Unity’s documentation for details: https://docs.unity3d.com/Packages/com.unity.ai.navigation@2.0/manual/CreateNavMesh.html
11. Setting the Player and Camera
- The system needs to identify the player transform: Add the following code in your player control script:
private void Awake()
{
     MapManeger.SetPlayer(Player);
}
- Ensure your main camera has the tag MainCamera, or set it via code:
private void Awake()
{
     MapManeger.SetCamera(MyCamera);
}
- Reference the
WorldMapGameObject in your script, and bind a key or UI button to open it:
public GameObject WorldMap;
void Update()
{
    if (Input.GetKeyDown(KeyCode.Tab))WorldMap.SetActive(!WorldMap.activeSelf);
}
Final Steps
Run your game and test the full functionality:
- Ensure the map loads correctly.
- Confirm Map Point, Navigation Path, and UI interactions work as expected.