Setting Up NPC Character
Create Prefab
- Duplicate the NPC and Player prefab located in:
Assets/SoftKitty/MasterCharacterCreator/Prefabs/for your player and NPC. - You can build your own demo or download the pre-made demo using the link below. This allows for a quicker and more streamlined way to create and save appearance files for your player and NPC characters: Download Demo (google drive)
- It is recommnended to use
MCCwith SoftKitty shared system EntityManagerObject, the Entity of EntityManagerObject will manage character customization data along with Attributes, tags, CustomData and OverTimeEffect. To enable this, simply add EntityComponent to the character prefab, and select aUIDfrom the EntityManagerObject database.
CREATE INITIAL APPEARANCE
- Pre-designed appearance:
Use the
Demoscene to design your player's initial appearance. Save this data in either the Resources folder or a designated folder within your game’s installation directory (where player save files are stored). Then use the load methods in #5 below to load this appearance data to the player character. - Default appearance: You can leave the player as default appearance , to do that, use the following code to Initialize your player to the default appearance:
GetComponent<CharacterEntity>().Initialize (Sex _sex)
Let player create their character: If you want to begin with character creation interface to let player to create their character before playing, simply call:
GetComponent<CharacterEntity>(). CreateCharacter ()
ADD NPC CONTROL SCRIPT
Attach your custom NPC control script to the root GameObject of the prefab. View the [Character Controllers] section for more details.
ASSIGN MECANIM CONTROLLERS
In the CharacterEntity component, assign a Mecanim controller to both the Male and Female slots to handle animations.

UNCHECK 'LOAD FROM PRESET FILE'
In the CharacterEntity component, uncheck the Load from preset file option to allow loading from save files.
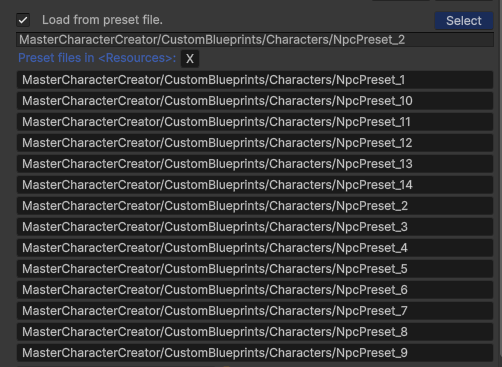
For example:
MasterCharacterCreator/CustomBlueprints/Characters/NpcPreset_1

GENERATING A STATIC NPC CHARACTER PREFAB
If your Non-Player Character (NPC) does not require any runtime customization (e.g., swapping clothes or features during gameplay), you can generate a static, optimized character prefab using the Master Character Creator (MCC) tools. This allows the NPC to be used efficiently as a standard, pre-configured asset.
Here is the process for creating the prefab:
- Open the Tool: Access the utility by navigating to
Window > MasterCharacterCreator > Toolsin the editor menu. - Select Source Preset: Click the
Selectbutton to choose the source character data file (the*.bytespreset) that contains the configuration for your NPC. - Define Asset Paths:
- Character Asset Folder Name: Input the name for the folder where the tool will save the unique, generated materials and textures for this specific character.
- Prefab Name: Input the desired name for the final character prefab asset.
- Generate Prefab: Click the
Generate Character Prefabbutton. The new prefab will be created in your project, along with its unique material assets, and will be automatically selected in the Project window.
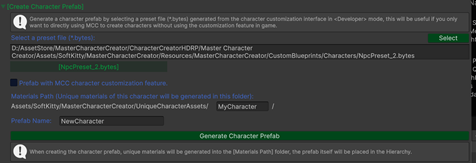
EXPORTING THE PREFAB
The generated prefab and its associated assets are now ready for use. If you wish to export this character prefab to a different project, ensure you uncheck the All script checkbox during the package creation process. You only need to include the CharacterBoneControlLite.cs script, along with the prefab and its associated textures and materials, to ensure the exported asset functions correctly.