Setting Up Player Character
Create Prefab
- Duplicate the NPC and Player prefab located in:
Assets/SoftKitty/MasterCharacterCreator/Prefabs/for your player and NPC. - You can build your own demo or download the pre-made demo using the link below. This allows for a quicker and more streamlined way to create and save appearance files for your player and NPC characters: Download Demo (google drive)
- It is recommnended to use
MCCwith SoftKitty shared system EntityManagerObject, the Entity of EntityManagerObject will manage character customization data along with Attributes, tags, CustomData and OverTimeEffect. To enable this, simply add EntityComponent to the character prefab, and select aUIDfrom the EntityManagerObject database.
CREATE INITIAL APPEARANCE
- Pre-designed appearance:
Use the
Demoscene to design your player's initial appearance. Save this data in either the Resources folder or a designated folder within your game’s installation directory (where player save files are stored). Then use the load methods in #5 below to load this appearance data to the player character. - Default appearance: You can leave the player as default appearance , to do that, use the following code to Initialize your player to the default appearance:
GetComponent<CharacterEntity>().Initialize (Sex _sex)
Let player create their character: If you want to begin with character creation interface to let player to create their character before playing, simply call:
GetComponent<CharacterEntity>(). CreateCharacter ()
ADD PLAYER CONTROL SCRIPT
Attach your custom player control script to the root GameObject of the prefab. View the Character Controllers section for more details.
ASSIGN MECANIM CONTROLLERS
In the CharacterEntity component, assign a Mecanim controller to both the Male and Female slots to handle animations.

UNCHECK 'LOAD FROM PRESET FILE'
In the CharacterEntity component, uncheck the Load from preset file option to allow loading from save files.
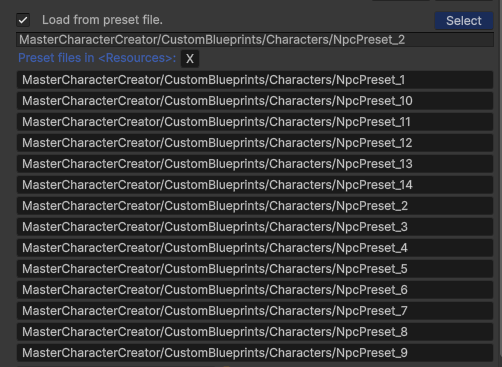
For example:
MasterCharacterCreator/CustomBlueprints/Characters/NpcPreset_1

LOAD APPEARANCE IN SCRIPT
skip this if you're using EntityManagerObject
In your player control script, use the following code to load the player’s appearance from the Resources folder:
GetComponent<CharacterEntity>().LoadFromResourceFile()
Alternatively, use LoadFromByteFileFromDisk or LoadFromPngFileFromDisk to load appearance data from a custom save location within your game’s installation path. For example: Application.dataPath+"/../GameSave/PlayerAppearance.bytes"
If you want to loads the appearance data with your own save system, you can get the bytes array of player’s appearance data with:
GetComponent<CharacterEntity>(). LoadFromBytes(byte[] _bytes)
SAVE APPEARANCE IN SCRIPT
Skip this if you're using EntityManagerObject
In your player control script, use:
GetComponent<CharacterEntity>().SaveByteFileToDisk ()
or use the following code to save the player’s appearance to custom save location within your game’s installation path. For example: Application.dataPath+"/../GameSave/PlayerAppearance.bytes"
GetComponent<CharacterEntity>(). SavePngFileToDisk()
If you want to save the appearance data with your own save system, you can get the bytes array of player’s appearance data with:
GetComponent<CharacterEntity>(). GetSaveBytes()